Links and Articles Worth Reading
DIY Guide: How to Build a WordPress Website

So you've decided to build a website yourself because you're on a budget, but are kinda hesitant to start because it seems complicated and you feel overwhelmed...well the good news is anyone can actually learn how to do it...all you have to do is to make sure you gather the right info and stick to some rules!
In this article, we're going to take you through the important steps to get WordPress up and running yourself. It's the basic setup and generally there will be more to do...but lets not overwhelm you...one step at a time!
First off, let's talk about why is WordPress might be the best option for you.
- WordPress is FREE - yes you can opt for premium add ons, but it is not necessary.
- Its unique features make it the most popular site builder - nearly 40% of all sites worldwide are built on WordPress! (as of 2021)
- It is user-friendly not only for experts but also for beginners - there is a plethora of help docs online.
- They offer a wide array of free theme options - thousands and thousands!
- WordPress sites are more Google-friendly - Google loves WordPress
- It has thousands of plugins and specialised functions for your particular needs - only install features you need!
- You host it on the web hosting platform of your choice - you are in control.
For beginners, you have 2 options for starting a WordPress site. There is WordPress.com and WordPress.org...but what's the difference?
Simply put, if your goal is to use your website for hobby blogging and online content, use WordPress.com...it's simplified and safe. If you feel you need to have full control of your website's design elements and features and want to customise it so that it is aligned with your business brand and future plans, WordPress.org (self-hosted) is best to use.
At Design Diva, we only work with the WordPress.org self hosted software. It is important for us to have full control and no feature or design restrictions. With that said, lets show you how to do it yourself.
Step 1: Choose a Domain Name and Website Hosting
You are going to need a domain name and website hosting. Some hosting companies offer domain services as well as web hosting, but don't make this the sole reason for choosing a particular service.
When purchasing a domain, keep the name as short as possible, decide whether to use .com, .com.au, or other top level domains that are available. Try not to use dashes or underscores in your domain name. Once you've purchased a domain, you will need to hold on to your login details, as you will need to log in to the dashboard to change the Nameservers and other records so that it connects to your website.
Good quality web hosting is important. It gives you a number of benefits such as instant technical support, better site speed, and web security, which general 'shared hosting' web hosting services don't usually have. Other premium features to consider are:
- Reliability - website uptime
- Unlimited storage space
- User friendly dashboard

- Nightly backups
- Data recovery
- Hosting designed specifically for WordPress
We use and recommend www.SixFive.com.au for all our domain names
For good basic hosting we recommend and use Dreamhost
For Managed WordPress hosting we use and love FlyWheel
Step 2: Set up your preferred Hosting account
Once you've decided on which hosting service to use, it's time to set up your account.
First, log in to your domain registrar and point your domain name to the hosting as instructed by your hosting company (if purchased elsewhere). Next, fully host your domain name, and install WordPress on your hosting. There should be a one-click install option on most good hosting platforms. All hosting companies are somewhat different in their structure but they will all have help docs to get you up and running.
Step 3: Install your WordPress Plugins and Theme
To set up WordPress for your needs, start by logging in to WordPress via your welcome email and set your password.
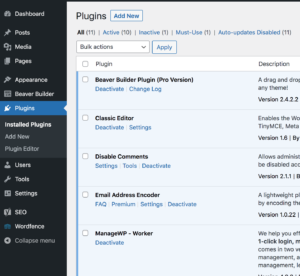
PLUGINS
Plugins add extra functionality to your site, but you should only choose what you need from the thousands of free and paid options so that you keep your site as lightweight as possible. Don't get overexcited with the options!
- Delete installed plugins: Hello Dolly, and Akismet - unless you're blogging with WordPress comments.
- Install necessary plugins. If you are on economical shared hosting, upload and set up your security plugin first! (we recommend using Wordfence)
- Upload and setup other important plugins that provide: Backups, Cache, SEO.
- Install a page builder like Beaver Builder (BB) plugin so that you have more design control. Love love love Beaver Builder...it makes WordPress fun!
- Activate all plugins except for the Cache.
- Choose plugins that are consistently updated, have good reviews, and have a lot of downloads.
Pro-tip:
Here's our must-use plugin list.
- Beaver Builder (premium plugin)
- Classic Editor
- Disable Comments
- Email Address Encoder
- Yoast SEO
Note: If using basic shared hosting then these plugins also need to be added: Updraft Plus Backups, WP Super Cache, Wordfence Security.
THEMES

There are a LOT of themes to choose from so choose one that has the look and feel you need, and has good reviews.
We use the Beaver Builder theme which is very simple and unstructured, paired with the Beaver Builder Page Builder so that pages start out as a blank slate (with the option to install ready made templates and sections). If you like that type of freedom, do the following:
- Install BB theme & Child theme (Buy the Pro Package here)
- Delete all WP themes except for one
- Activate the BB Child theme
- Upload the Beaver Builder plugin
CUSTOMISER SETTINGS
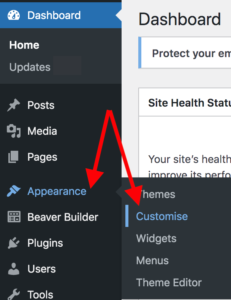
Go to Appearance>Customise and set your default page layouts, fonts, header and footer and other available options (options vary depending on your theme)
GENERAL WORDPRESS SITE SETTINGS
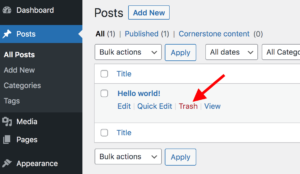
- Delete the sample post, sample comment, & sample page.
- Create a new blank home page and other necessary pages.
- Set up your menus
It is important to do the following items below before building pages and designing anything -
Under 'Settings', go to:
General: Set your Title, tagline, email address, set the timezone, date format & time format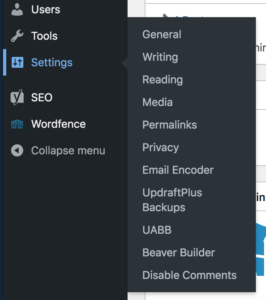
Writing: Choose Classic editor (plugin), switch editors - No
Reading: Set static homepage, search engine visibility - Off (turn on when the site is built)
Media: Leave as is
Discussion: First 3 options: off, off, off (if using Disable Comments Plugin, this option is not available)
Permalinks: Post Name (use Custom Structure /%category%//%postname%/ if categories are needed otherwise just /%postname%/)
Privacy: Preview and edit your privacy policy template (view the guide for help)
Email Encoder: Make sure it is active
Updraft Plus Backups: Set up a backup schedule and destination - Google Drive is simple.
Beaver Builder: Set up your options. See steps below:
- Settings > Beaver Builder > Add your License, Post Types: Posts & Pages.
- Modules: Leave as default.
- Templates: User Templates only.
- User Access: Administrator only for everything.
- Icons: All.
Yoast SEO:
- Use the Configuration Wizard - easy peasy
IMPORTANT REMINDER
Don't forget to keep the WordPress core, Themes, and Plugins up to date. When updates are available... UPDATE! If you have Wordfence security installed, you'll receive email alerts...which is a good thing!
Step 4: Build your pages and posts
Now you’re ready to start building your pages!
Pages and posts look the same but always remember posts are used for blogging and will collate on a blog page. Most of your page layout options were set up in the Customiser. Your Header, Menu bar, Footer, and Sidebars (if using) are automatically added to every page.
Familiarise yourself with the options which can be set in the standard WordPress page/post editor: page title and permalink, status and visibility, revisions, page attributes, SEO options and featured image. If you're using Beaver Builder page builder you will not be adding any page content here!
Have a look at the available page builder templates and sections for ideas or a quick and easy setup. Remember to keep your, colours, fonts and images on-brand and uncomplicated.
For a blog, you'll need a page to display the posts on. The best looking blog page is one you'll design yourself with the Page Builder modules. If you choose a page as your main blog page through the WordPress settings, WordPress will set up a generic template which is...well...generic....better to invest your time customising the page with the page builder so that your blog looks fresh and inviting.
Step 5: Security, Backups, Cache, and Testing
If you have chosen a more economical hosting, there are a few things you'll need to take care of yourself in regard to website maintenance. Firstly, security....as mentioned in Step 3...make sure it's activated and running and sending you email alerts. Likewise with backups....make sure your backups are automated and working. Activate your cache plugin which will ensure yoru site loads as quickly as possible.
Testing...with around 50% of website views being on mobile devices, you need to check that all your pages look good on mobile. Then make sure all your links and buttons are working, and send yourself a message on the contact form to make sure you are receiving messages.
Now...we've made it sound really simple to build a WordPress site....it's not really...there's quite a steep learning curve to WordPress, which is why many people gravitate towards an easier option like Wix or Weebly and pay the price down the track with costs and restrictions rather than the upfront cost of time learning. Remember that most learning difficulties come more from fear rather than the level of the actual lessons...
Recap - lets keep it simple!
Step 1: Choose a domain name and website hosting
Step 2: Set up your preferred hosting account
Step 3: Install your WordPress Plugins, Themes, and customise settings
Step 4: Build your pages and posts
Step 5: Make sure you have security, backups and cache set up

Here are the products and services we use and recommend:
Heads up - they're affiliate links because we love them so much 😉
If you have any questions... we're here to help...and of course, we've been building WordPress sites for 12 years or so now...so if you'd prefer we put it together for you, just pick up the phone.
How's Your Website Looking?
Old?...broken?...hacked?...Don't know where to start?
Book a Free Website Health Check
Don't have a website yet? Book a Strategy Call!